- Make sure IOMMU/VT-d/SVM support is enabled in your BIOS/UEFI.
- Make sure both onboard and dedicated graphics are turned on
- edit your grub file (
nano -B /etc/default/grub) to have the theGRUB_CMDLINE_LINUX_DEFAULTsetting readGRUB_CMDLINE_LINUX_DEFAULT="modprobe.blacklist=nouveau quiet splash intel_iommu=on"- this will both enable virtualization and disable loading NVidia drivers so that the video card is available to the VM later
- save and exit
- run
update-grub
dmesg | grep -i "Directed I/O"- should get a result similar to
[ 0.754554] DMAR: Intel(R) Virtualization Technology for Directed I/O - If this is not working, there is no point in continuing. Either fix it or give it up!
apt update && apt upgradeapt install qemu-kvm seabios qemu-utils cpu-checker hugepages ovmf- This may not be necessary, but I also added my non root user to these groups (should allow for VM management without root privs):
adduser username libvirtadduser username libvirt-qemu
- Get a list of the PCI devices to passthrough:
lspci | grep VGA- I got these in my output:
-
00:02.0 VGA compatible controller: Intel Corporation Xeon E3-1200 v3/4th Gen Core Processor Integrated Graphics Controller (rev 06)
01:00.0 VGA compatible controller: NVIDIA Corporation GP107 [GeForce GTX 1050 Ti] (rev a1)
-
- We need to isolate the NVidia card, so we use the number ID at the beginning to make our next call:
lspci -nn | grep 01:00.
- This gives me this output:
-
01:00.0 VGA compatible controller [0300]: NVIDIA Corporation GP107 [GeForce GTX 1050 Ti] [10de:1c82] (rev a1)
01:00.1 Audio device [0403]: NVIDIA Corporation GP107GL High Definition Audio Controller [10de:0fb9] (rev a1)
-
- Note the IDs in brackets:
10de:1c82and10de:0fb9- we will need to tell pci-stub to capture these at boot so that they are available to pass to the video card to the VM - We will update our grub line from earlier to read this now (insert your own IDs obviously):
GRUB_CMDLINE_LINUX_DEFAULT="modprobe.blacklist=nouveau quiet splash intel_iommu=on pci-stub.ids=10de:1c82,10de:0fb9"
- Set drivers to load:
- edit
/etc/initramfs-tools/modulesand add this to the end of the file:-
pci-stub
vfio
vfio_iommu_type1
vfio_pci
vhost-net
-
- edit
- Run the updaters for what we just changed:
update-initramfs -uupdate-grubreboot
lsmod | grep vfio- Output should resemble:
-
vfio_pci               45056  0
vfio_virqfd            16384  1 vfio_pci
irqbypass              16384  2 kvm,vfio_pci
vfio_iommu_type1       24576  0
vfio                   28672  2 vfio_iommu_type1,vfio_pci
dmesg | grep pci-stub- Output should resemble:
-
[    0.000000] Command line: BOOT_IMAGE=/boot/vmlinuz-4.15.0-20-generic root=UUID=be3fcb78-a978-42b3-8645-d0eecca915c0 ro modprobe.blacklist=nouveau quiet splash intel_iommu=on pci-stub.ids=10de:1c82,10de:0fb9 vt.handoff=1
[    0.000000] Kernel command line: BOOT_IMAGE=/boot/vmlinuz-4.15.0-20-generic root=UUID=be3fcb78-a978-42b3-8645-d0eecca915c0 ro modprobe.blacklist=nouveau quiet splash intel_iommu=on pci-stub.ids=10de:1c82,10de:0fb9 vt.handoff=1
[    3.510239] pci-stub: add 10DE:1C82 sub=FFFFFFFF:FFFFFFFF cls=00000000/00000000
[    3.510248] pci-stub 0000:01:00.0: claimed by stub
[    3.510259] pci-stub: add 10DE:0FB9 sub=FFFFFFFF:FFFFFFFF cls=00000000/00000000
[    3.510264] pci-stub 0000:01:00.1: claimed by stub
[  422.555531] pci-stub 0000:01:00.0: claimed by stub
[  422.579562] pci-stub 0000:01:00.1: claimed by stub
[  675.694232] pci-stub 0000:01:00.0: claimed by stub
[  675.718286] pci-stub 0000:01:00.1: claimed by stub
[ 2991.730642] pci-stub 0000:01:00.0: claimed by stub
[ 2991.754611] pci-stub 0000:01:00.1: claimed by stub
[ 3002.475349] pci-stub 0000:01:00.0: claimed by stub
[ 3002.495329] pci-stub 0000:01:00.1: claimed by stub
[10904.458024] pci-stub 0000:01:00.0: claimed by stub
[10904.478002] pci-stub 0000:01:00.1: claimed by stub
[67840.033312] pci-stub 0000:01:00.0: claimed by stub
[67840.053308] pci-stub 0000:01:00.1: claimed by stub
dmesg | grep VFIO- Output should resemble:
-
[ 3.512148] VFIO - User Level meta-driver version: 0.3
kvm-ok- Output should resemble:
-
INFO: /dev/kvm exists
KVM acceleration can be used
lsmod | grep kvm- Output should resemble:
-
kvm_intel             204800  0
kvm                   593920  1 kvm_intel
irqbypass              16384  2 kvm,vfio_pci
- If you just want to do easy mode, you can just choose NAT when you create the VM. This, however, will isolate the VM from your network, so if you want to do something on the order of hosting a game server or push content to a Chromecast/Steamlink device, you will need to set up bridging as that will allow your VM to access the network directly.
- Note that this method requires a wired connection - there are apparently ways to set up WLAN connections, but I have not done it and won't be covering it here. There should be a link in one of the resources above.
- First, you need to identify your network device. Do that with
ip a- output should resemble this:-
1: lo: <LOOPBACK,UP,LOWER_UP> mtu 65536 qdisc noqueue state UNKNOWN group default qlen 1000
link/loopback 00:00:00:00:00:00 brd 00:00:00:00:00:00
inet 127.0.0.1/8 scope host lo
   valid_lft forever preferred_lft forever
inet6 ::1/128 scope host
   valid_lft forever preferred_lft forever
2: enp0s25: <BROADCAST,MULTICAST,UP,LOWER_UP> mtu 1500 qdisc fq_codel state UP group default qlen 1000
link/ether de:ad:be:ef:ca:fe brd ff:ff:ff:ff:ff:ff
inet 192.168.1.124/24 brd 192.168.1.255 scope global dynamic noprefixroute enp0s25
   valid_lft 86369sec preferred_lft 86369sec
3: virbr0: <NO-CARRIER,BROADCAST,MULTICAST,UP> mtu 1500 qdisc noqueue state DOWN group default qlen 1000
link/ether 52:ad:52:17:5f:de brd ff:ff:ff:ff:ff:ff
inet 192.168.142.1/24 brd 192.168.142.255 scope global virbr0
   valid_lft forever preferred_lft forever
4: virbr0-nic: <BROADCAST,MULTICAST> mtu 1500 qdisc fq_codel master virbr0 state DOWN group default qlen 1000
link/ether 52:54:30:17:7c:ad brd ff:ff:ff:ff:ff:ff
-
- ignore
loand anything that starts withvir- in this case, that leavesenp0s25. If you have multiple NICs, you'll want the one that actually has an IP address assigned to it. - You will need to edit your
/etc/network/interfacesfile to look like this (of course, replaceenp0s25with whatever your value is):-
# interfaces(5) file used by ifup(8) and ifdown(8)
auto lo
iface lo inet loopback
auto br0
iface br0 inet dhcp
    bridge_ports enp0s25
    bridge_stp off
    bridge_maxwait 5
-
- from here, you either need to run
ifup br0(br0is the bridge interface we just created) OR simplyreboot. I opted to reboot.
- Open the virtman GUI
- File -> New Virtual Machine
- Follow the wizard with this guide:
- local install iso (select the win10 iso downloaded earlier)
- set ram to
4096 - set cpus to total cores -1 (I have 4 cores, I set to 3)
- create a disk image (I used qcow2) or link to a physical disk. If you create a raw disk, you will get better performance
- set the network how you want. Choose the bridge br0 option if you set up bridging earlier, otherwise just choose NAT for easy mode.
- name the VM and note what you name it
- before you finish, check the
Customize configuration before installbox
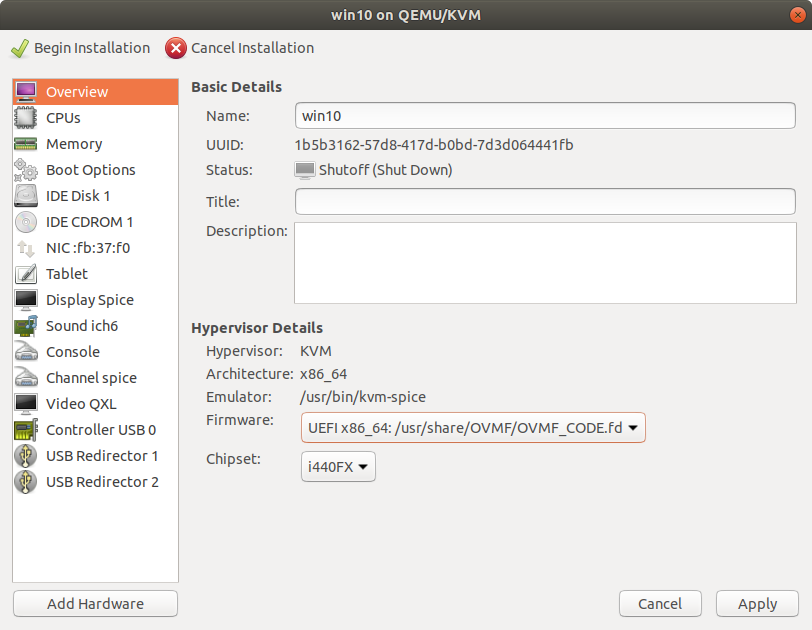
- When you get the customization page, set to UEFI for bios and apply changes:
- In CPUs, manually type
host-passthroughinto the model field:- I had also manually set the topology as per the image
- when you do that, be sure to set the current allocation to the proper value again if it changes
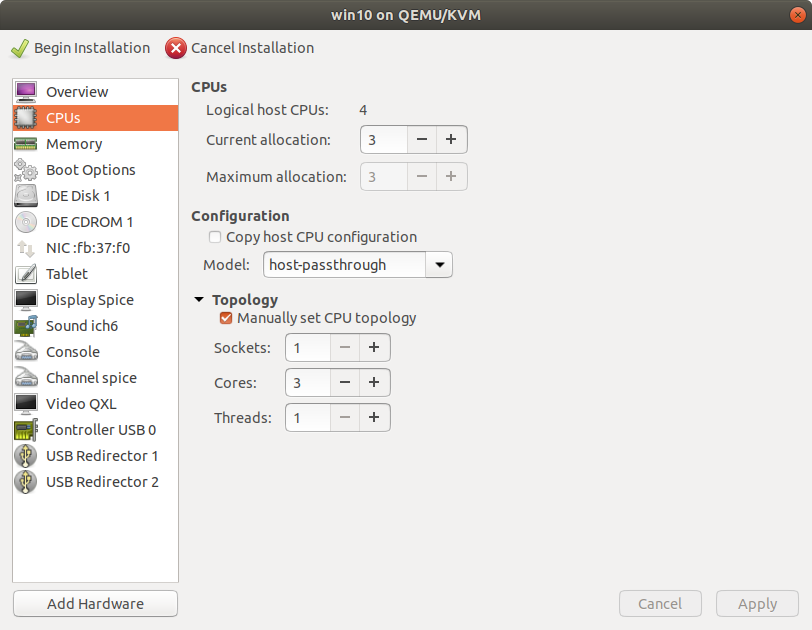
- I had also manually set the topology as per the image
- If you are using a disk image, set the disk bus to VirtIO (this will change the IDE Disk to VirtIO Disk in the menu)
- Alternatively, if you want to dedicate an entire drive to the guest, you will need to use the following template to enter into the xml file in the
<devices>section (virsh edit [vmname]- more thorough instructions are listed later in this document) - obviously change the path variables to match your settings -
<disk type='block' device='disk'> <driver name='qemu' type='raw'/> <source dev='/dev/sdc3'/> <target dev='vdb' bus='virtio'/> </disk> - source
- Alternatively, if you want to dedicate an entire drive to the guest, you will need to use the following template to enter into the xml file in the
- Add a second CD Drive and attach the downloaded virtio iso from earlier
- note that even though the first CD drive appear empty, KVM will automatically use it to attach the Windows installer ISO when you click the Begin Installation button
- Set the network card to use VirtIO for device model
- Add hardware for the video card as PCI Host Device (both the video card and sound portions)
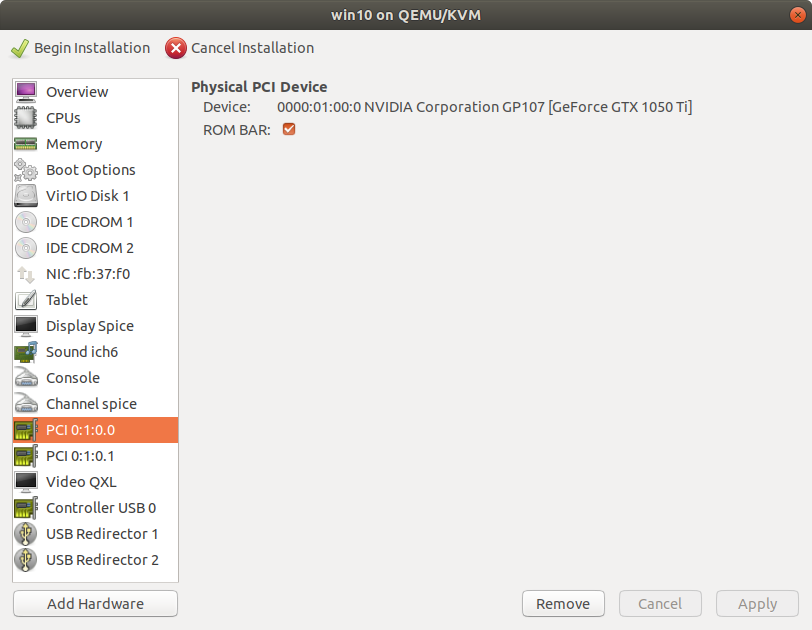
- note that this will likely NOT work during the initial installation!
- Add any keyboards and mice you want to have as a direct connection to the VM for direct pass through as a USB Host Device (note that these selected devices will lose their connection to Linux for the duration that the VM is on - you may want dedicated keyboard/mouse hardware for this)
- At this point, you should be able to apply all changes and begin installation
- note that while this might display on your second monitor, use the window on your linux screen as portions are missing from the second monitor currently
- you will be brought to an EFI prompt most likely. Enter the following commands:
fs0:dircd efidircd bootdirbootx64.efi- when you enter here, it will prompt you to press any key to start from the cd/dvd - do so quickly
- proceed through the install
- I would suggest not putting a cd key in yet as I don't trust microsoft to understand the potential radical changes you might be making to the underlying hardware of the vm - it may deactivate your install and use up one of your limited activations. I would suggest manually selecting the version of windows you have a key for and then activating it once you have all your configurations correct.
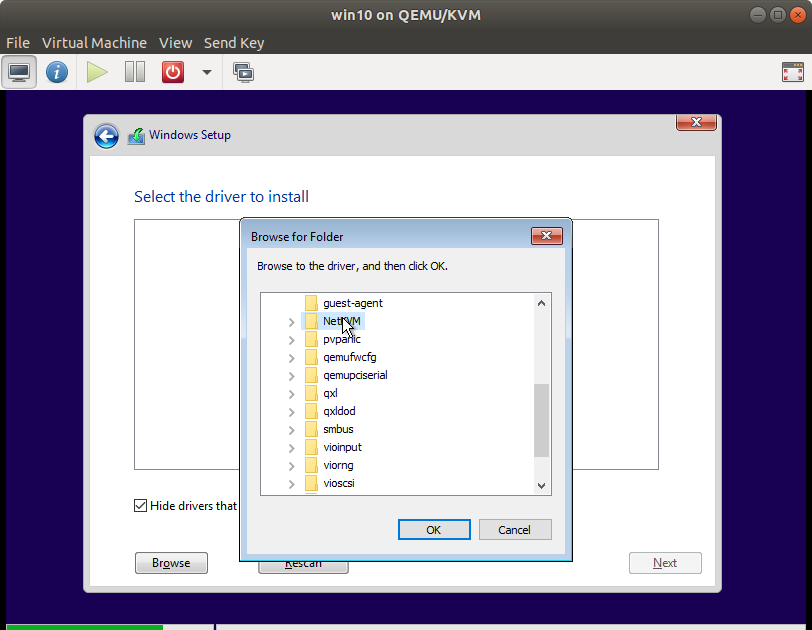
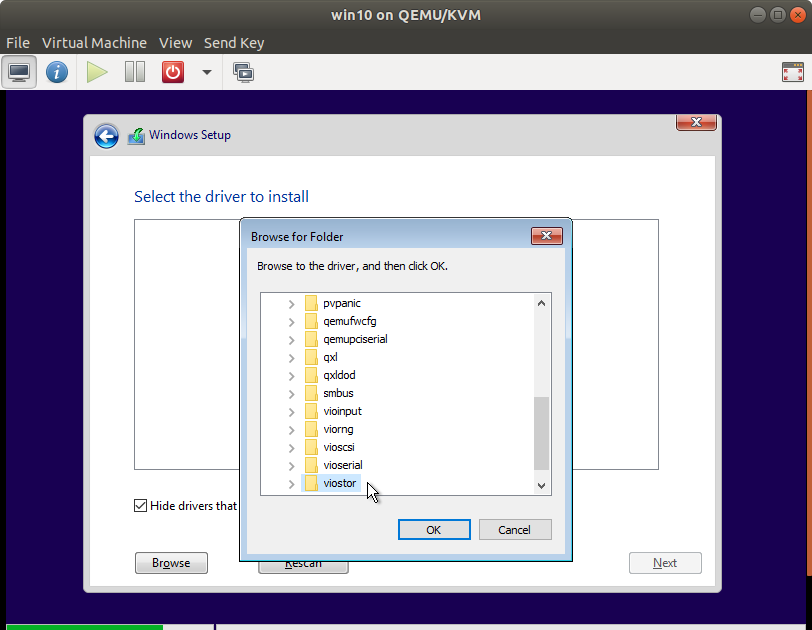
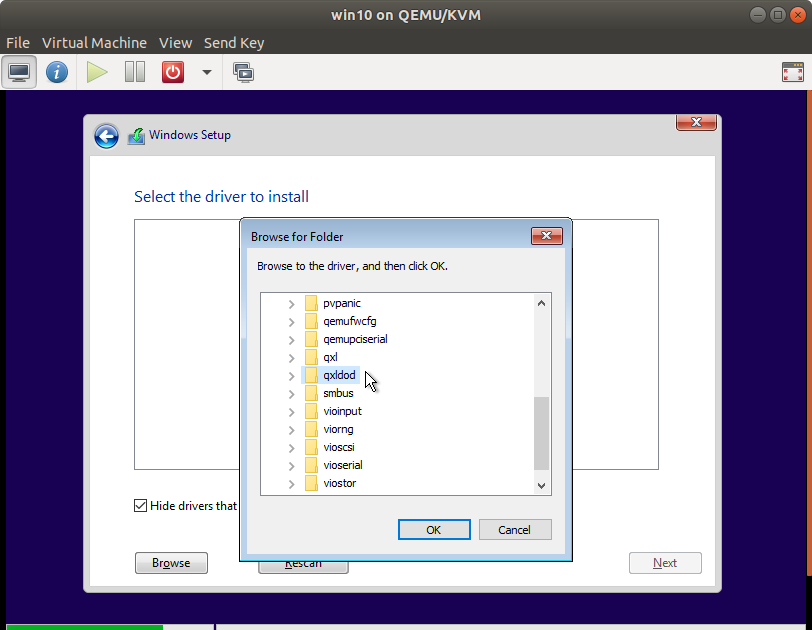
- When you get to the drive selection page, you'll likely notice that there's no drive to install to - that's what the virtio drivers are for:
- I would suggest installing the following for sure:
NetKVM- networkviostor- storageqxldod(qxlfor windows prior to 8 iirc - more info in the wiki) - (non passthrough) video acceleration
- I would suggest installing the following for sure:
- From here on out, you should be able to partition your drive and install Windows as normal.
- Proceed with the install and once you get to the desktop, shut the VM down.
Final configurations
-
setup hugepages
- I ended up disabling hugepages as it is a constant reservation of memory specifically FOR the VM. That ultimately means that I didn't have 10ish GB usable, even when the VM was off, and that was a pretty big hit when using Ubuntu. In my one test, just making sure there was enough memory to boot the VM, I didn't notice any performance hit. That is, of course, subjective. I am therefore going to declare hugepages as highly optional.
hugeadm --explain- if you get
hugeadm:ERROR: No hugetlbfs mount points found, edit/etc/default/qemu-kvmto either add or uncomment this line:KVM_HUGEPAGES=1- and reboot
- if you get
-
the output should resemble:
-
Total System Memory: 15787 MB

Mount Point          Options
/dev/hugepages       rw,relatime,pagesize=2M

Huge page pools:
Size Minimum Current Maximum Default
2097152 0 0 0 *
...
-
- our takeaway from this is the pagesize (2M) and minimum, current, and maximum values - we need to set them to something other than 0
- Our formula is (amount of ram we want to set for VM (12288M) / hugepage size (2M)) * (1.075) = 6605
- change this formula to match your desired value and pagesize, then put your result in
/etc/sysctl.confwith a line like:vm.nr_hugepages = 6605- side note - after using this for a couple days, I found that granting 12GB+buffer to the VM with 16GB total in the system didn't leave much for me to do anything useful in Ubuntu, so I lowered the value to 10GB/5504 hugepages
- change this formula to match your desired value and pagesize, then put your result in
- reboot to let this take effect
- run
hugeadm --explainagain- you should see a section that says something like:
-
The recommended shmmax for your currently allocated huge pages is 13851688960 bytes.
To make shmmax settings persistent, add the following line to /etc/sysctl.conf:
kernel.shmmax = 13851688960
- edit
/etc/sysctl.confand add the line it requested hugeadm --set-recommended-shmmaxto set it for now without rebooting- Finally, we need to set the VM to use the hugepages:
virsh edit [name of vm no brackets]- add this before the
<os>tag-
<memoryBacking>
<hugepages/>
</memoryBacking>
-
- save and close the file
- in the virtman gui, open the machine and click the blue I to edit the settings. Set the memory from 4096 to whatever value you actually wanted to dedicate for the VM (12288 in my example case) and apply
- fix nvidia code43 driver issue
- before the NVidia card will work, we need to trick the driver into thinking it's NOT in a VM.
- run
virsh edit [name of vm no brackets]again - put these new entries inside the
<features>tag (the###########can be any 12 hexadecimal characters, for example123456790ab)-
...
<features>
<hyperv>
    ...
    <vendor_id state='on' value='############'/>
    ...
</hyperv>
...
<kvm>
<hidden state='on'/>
</kvm>
</features>
...
-
- save, exit and boot up the VM. Within the VM, go to NVidia's site and download and install drivers. If it doesn't work right away, a VM reboot should get the video card working!